19
章节19
创建一个简单的博客架构
我们的示例中的博客文章将以本地 Markdown 文件的形式存储在应用程序目录中(而不是从外部数据源获取),因此我们需要从文件系统读取数据。
在本节中,我们将介绍创建从文件系统读取 Markdown 数据的博客的步骤。
创建 Markdown 文件
首先,在根文件夹中创建一个名为 posts 的新顶级目录(这与 pages/posts 不同)。在 posts 内部,创建两个文件:pre-rendering.md 和 ssg-ssr.md。
现在,将以下代码复制到 posts/pre-rendering.md
---
title: 'Two Forms of Pre-rendering'
date: '2020-01-01'
---

Next.js has two forms of pre-rendering: **Static Generation** and **Server-side Rendering**. The difference is in **when** it generates the HTML for a page.

- **Static Generation** is the pre-rendering method that generates the HTML at **build time**. The pre-rendered HTML is then _reused_ on each request.
- **Server-side Rendering** is the pre-rendering method that generates the HTML on **each request**.

Importantly, Next.js lets you **choose** which pre-rendering form to use for each page. You can create a "hybrid" Next.js app by using Static Generation for most pages and using Server-side Rendering for others.
然后,将以下代码复制到 posts/ssg-ssr.md
---
title: 'When to Use Static Generation v.s. Server-side Rendering'
date: '2020-01-02'
---

We recommend using **Static Generation** (with and without data) whenever possible because your page can be built once and served by CDN, which makes it much faster than having a server render the page on every request.

You can use Static Generation for many types of pages, including:

- Marketing pages
- Blog posts
- E-commerce product listings
- Help and documentation

You should ask yourself: "Can I pre-render this page **ahead** of a user's request?" If the answer is yes, then you should choose Static Generation.

On the other hand, Static Generation is **not** a good idea if you cannot pre-render a page ahead of a user's request. Maybe your page shows frequently updated data, and the page content changes on every request.

In that case, you can use **Server-Side Rendering**. It will be slower, but the pre-rendered page will always be up-to-date. Or you can skip pre-rendering and use client-side JavaScript to populate data.
您可能已经注意到,每个 Markdown 文件的顶部都有一个包含
title和date的元数据部分。这称为 YAML Front Matter,可以使用一个名为 gray-matter 的库来解析。
安装 gray-matter
首先,安装 gray-matter,它允许我们解析每个 Markdown 文件中的元数据。
npm install gray-matter创建用于读取文件系统的实用函数
接下来,我们将创建一个用于从文件系统解析数据的实用函数。通过这个实用函数,我们希望:
- 解析每个 Markdown 文件并获取
title、date和文件名(将用作文章 URL 的id)。 - 在索引页面上列出数据,按日期排序。
在根目录中创建一个名为 lib 的顶级目录。然后,在 lib 内部,创建一个名为 posts.js 的文件,并复制粘贴此代码
import fs from 'fs';
import path from 'path';
import matter from 'gray-matter';

const postsDirectory = path.join(process.cwd(), 'posts');

export function getSortedPostsData() {
  // Get file names under /posts
  const fileNames = fs.readdirSync(postsDirectory);
  const allPostsData = fileNames.map((fileName) => {
    // Remove ".md" from file name to get id
    const id = fileName.replace(/\.md$/, '');

    // Read markdown file as string
    const fullPath = path.join(postsDirectory, fileName);
    const fileContents = fs.readFileSync(fullPath, 'utf8');

    // Use gray-matter to parse the post metadata section
    const matterResult = matter(fileContents);

    // Combine the data with the id
    return {
      id,
      ...matterResult.data,
    };
  });
  // Sort posts by date
  return allPostsData.sort((a, b) => {
    if (a.date < b.date) {
      return 1;
    } else {
      return -1;
    }
  });
}
注意
您不需要理解上述代码的作用,即可学习 Next.js,该函数旨在使博客示例正常运行。但如果您想了解更多信息
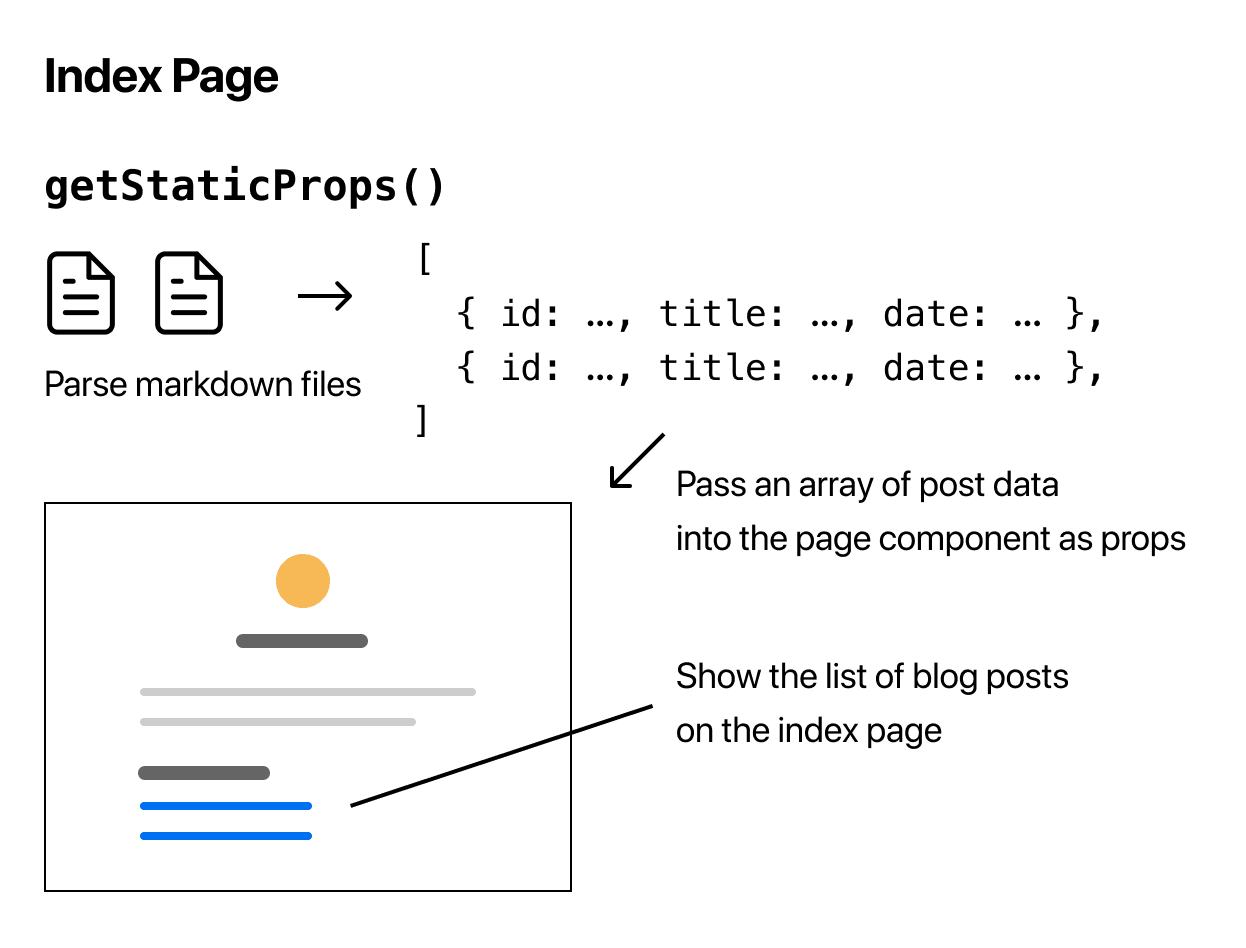
获取博客数据
现在博客数据已解析,我们需要将其添加到索引页面(pages/index.js)。我们可以使用 Next.js 的数据获取方法 getStaticProps() 来实现。在下一节中,我们将学习如何实现 getStaticProps()。
让我们在下一页进行!
这有帮助吗?