TypeScript
Next.js 内置了 TypeScript,当您使用 create-next-app 创建新项目时,会自动安装必要的包并配置适当的设置。
要将 TypeScript 添加到现有项目,请将文件重命名为 .ts / .tsx。运行 next dev 和 next build 以自动安装必要的依赖项并添加一个包含推荐配置选项的 tsconfig.json 文件。
温馨提示:如果您已经有一个
jsconfig.json文件,请将旧jsconfig.json中的paths编译器选项复制到新的tsconfig.json文件中,并删除旧的jsconfig.json文件。
IDE 插件
Next.js 包含一个自定义 TypeScript 插件和类型检查器,VSCode 和其他代码编辑器可以使用它们进行高级类型检查和自动完成。
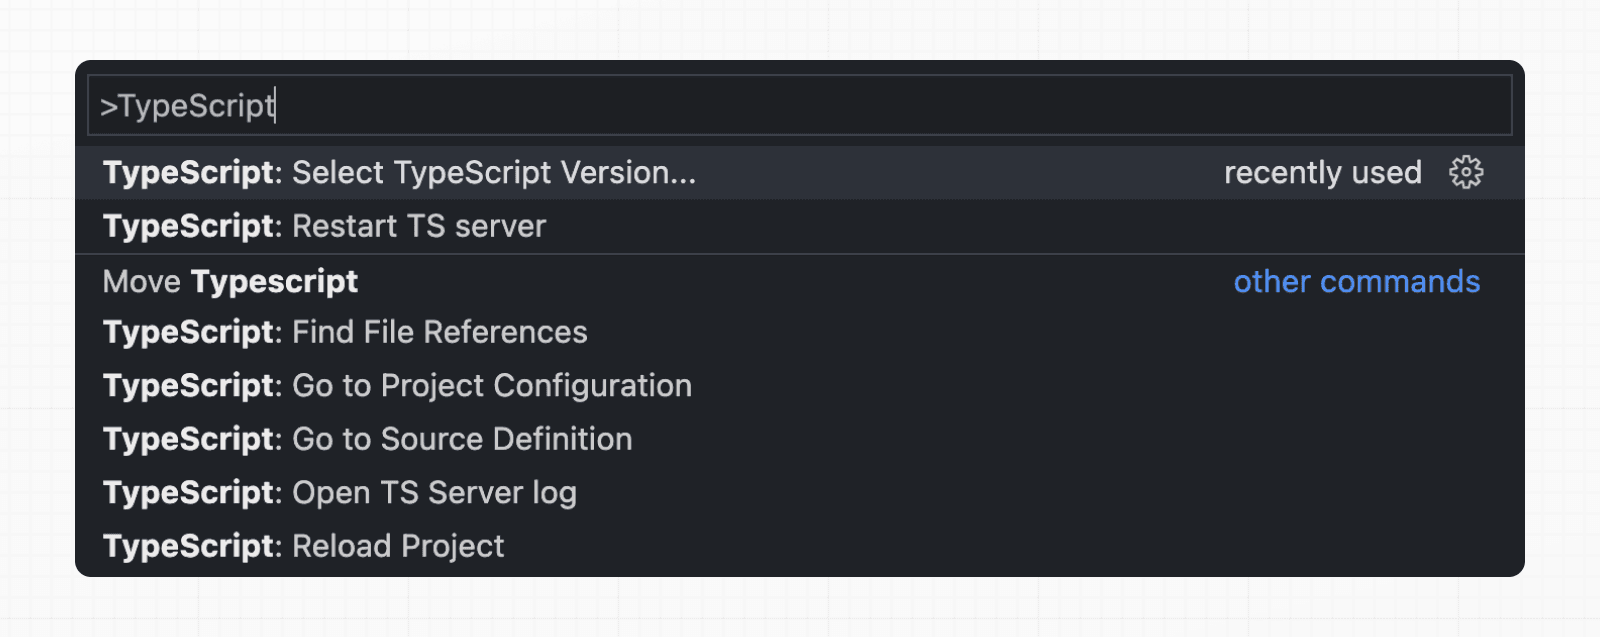
您可以通过以下方式在 VS Code 中启用该插件:
- 打开命令面板 (
Ctrl/⌘+Shift+P) - 搜索“TypeScript: 选择 TypeScript 版本”
- 选择“使用工作区版本”

现在,编辑文件时将启用自定义插件。运行 next build 时,将使用自定义类型检查器。
TypeScript 插件可以帮助:
- 如果传入段配置选项的无效值,则发出警告。
- 显示可用选项和上下文文档。
- 确保正确使用
'use client'指令。 - 确保客户端钩子(例如
useState)仅在客户端组件中使用。
🎥 观看: 了解内置 TypeScript 插件 → YouTube (3 分钟)
端到端类型安全
Next.js App Router 具有增强的类型安全。这包括:
- 无需在数据获取函数和页面之间序列化数据:您可以在服务器上的组件、布局和页面中直接进行
fetch。这些数据不需要被序列化(转换为字符串)即可传递到客户端以在 React 中使用。相反,由于app默认使用服务器组件,我们可以直接使用Date、Map、Set等值,无需任何额外步骤。以前,您需要使用 Next.js 特定的类型手动定义服务器和客户端之间的边界。 - 简化组件之间的数据流:随着
_app被根布局取代,现在更容易可视化组件和页面之间的数据流。以前,在各个pages和_app之间流动的数据很难进行类型定义,并可能引入令人困惑的错误。借助 App Router 中的共存数据获取,这不再是一个问题。
Next.js 中的数据获取现在提供了尽可能接近端到端类型安全,而无需对您的数据库或内容提供商选择进行强制规定。
我们可以像您期望的那样使用普通 TypeScript 来定义响应数据的类型。例如:
async function getData() {
  const res = await fetch('https://api.example.com/...')
  // The return value is *not* serialized
  // You can return Date, Map, Set, etc.
  return res.json()
}

export default async function Page() {
  const name = await getData()

  return '...'
}为了实现完整的端到端类型安全,这还要求您的数据库或内容提供商支持 TypeScript。这可以通过使用ORM或类型安全查询构建器来实现。
路由感知类型辅助函数
Next.js 为 App Router 路由类型生成全局辅助函数。这些无需导入即可使用,并在 next dev、next build 或通过next typegen生成。
示例
类型检查 Next.js 配置文件
您可以通过使用 next.config.ts 在 Next.js 配置中引入 TypeScript 类型。
import type { NextConfig } from 'next'

const nextConfig: NextConfig = {
  /* config options here */
}

export default nextConfig
next.config.ts 中的模块解析目前仅限于 CommonJS。但是,当为 Node.js v22.10.0 及更高版本使用 Node.js 原生 TypeScript 解析器时,可以使用 ECMAScript 模块 (ESM) 语法。
使用 next.config.js 文件时,您可以使用 JSDoc 在 IDE 中添加一些类型检查,如下所示:
// @ts-check

/** @type {import('next').NextConfig} */
const nextConfig = {
  /* config options here */
}

module.exports = nextConfig
为 next.config.ts 使用 Node.js 原生 TypeScript 解析器
注意:仅在 Node.js v22.10.0+ 上可用,并且仅在启用该功能时才可用。Next.js 不会启用它。
Next.js 通过在 v22.10.0 中添加的 process.features.typescript 检测 Node.js 原生 TypeScript 解析器。当存在时,next.config.ts 可以使用原生 ESM,包括顶级 await 和动态 import()。此机制继承了 Node 解析器的功能和限制。
在 Node.js 版本 v22.18.0+ 中,process.features.typescript 默认启用。对于 v22.10.0 和 22.17.x 之间的版本,请使用 NODE_OPTIONS=--experimental-transform-types 选择启用。
NODE_OPTIONS=--experimental-transform-types next <command>对于 CommonJS 项目(默认)
尽管 next.config.ts 在 CommonJS 项目中支持原生 ESM 语法,但 Node.js 默认仍将 next.config.ts 视为 CommonJS 文件,导致在检测到模块语法时 Node.js 重新解析该文件为 ESM。因此,我们建议在 CommonJS 项目中使用 next.config.mts 文件以明确指示它是一个 ESM 模块。
import type { NextConfig } from 'next'

// Top-level await and dynamic import are supported
const flags = await import('./flags.js').then((m) => m.default ?? m)

const nextConfig: NextConfig = {
  /* config options here */
  typedRoutes: Boolean(flags?.typedRoutes),
}

export default nextConfig
对于 ESM 项目
当 package.json 中将 "type" 设置为 "module" 时,您的项目使用 ESM。有关此设置的更多信息,请参阅Node.js 文档。在这种情况下,您可以直接使用 ESM 语法编写 next.config.ts。
温馨提示:当在您的
package.json中使用"type": "module"时,项目中的所有.js和.ts文件默认都被视为 ESM 模块。如果需要,您可能需要将使用 CommonJS 语法的文件重命名为.cjs或.cts扩展名。
静态类型链接
Next.js 可以静态地对链接进行类型检查,以防止在使用 next/link 时出现拼写错误和其他错误,从而在页面之间导航时提高类型安全性。
在 Pages 和 App Router 中均适用于 next/link 中的 href 属性。在 App Router 中,它还对 next/navigation 方法(如 push、replace 和 prefetch)进行类型检查。它不对 Pages Router 中的 next/router 方法进行类型检查。
字面量 href 字符串会被验证,而非字面量 href 可能需要使用 as Route 进行类型转换。
要选择使用此功能,需要启用 typedRoutes 并且项目需要使用 TypeScript。
import type { NextConfig } from 'next'

const nextConfig: NextConfig = {
  typedRoutes: true,
}

export default nextConfig
Next.js 将在 .next/types 中生成一个链接定义,其中包含有关应用程序中所有现有路由的信息,TypeScript 随后可以使用这些信息在编辑器中提供有关无效链接的反馈。
温馨提示:如果您在没有
create-next-app的情况下设置项目,请确保将生成的 Next.js 类型包含在内,方法是将.next/types/**/*.ts添加到tsconfig.json中的include数组中
{
  "include": [
    "next-env.d.ts",
    ".next/types/**/*.ts",
    "**/*.ts",
    "**/*.tsx"
  ],
  "exclude": ["node_modules"]
}
目前,支持包括任何字符串字面量,包括动态段。对于非字面量字符串,您需要手动使用 as Route 进行类型转换。以下示例显示了 next/link 和 next/navigation 的用法
'use client'

import type { Route } from 'next'
import Link from 'next/link'
import { useRouter } from 'next/navigation'

export default function Example() {
  const router = useRouter()
  const slug = 'nextjs'

  return (
    <>
      {/* Link: literal and dynamic */}
      <Link href="/about" />
      <Link href={`/blog/${slug}`} />
      <Link href={('/blog/' + slug) as Route} />
      {/* TypeScript error if href is not a valid route */}
      <Link href="/aboot" />

      {/* Router: literal and dynamic strings are validated */}
      <button onClick={() => router.push('/about')}>Push About</button>
      <button onClick={() => router.replace(`/blog/${slug}`)}>
        Replace Blog
      </button>
      <button onClick={() => router.prefetch('/contact')}>
        Prefetch Contact
      </button>

      {/* For non-literal strings, cast to Route */}
      <button onClick={() => router.push(('/blog/' + slug) as Route)}>
        Push Non-literal Blog
      </button>
    </>
  )
}
这同样适用于通过代理定义的重定向路由
import { NextRequest, NextResponse } from 'next/server'

export function proxy(request: NextRequest) {
  if (request.nextUrl.pathname === '/proxy-redirect') {
    return NextResponse.redirect(new URL('/', request.url))
  }

  return NextResponse.next()
}import type { Route } from 'next'
export default function Page() {
return <Link href={'/proxy-redirect' as Route}>Link Text</Link>
}要在包装 next/link 的自定义组件中接受 href,请使用泛型
import type { Route } from 'next'
import Link from 'next/link'

function Card<T extends string>({ href }: { href: Route<T> | URL }) {
  return (
    <Link href={href}>
      <div>My Card</div>
    </Link>
  )
}
您还可以定义简单的数据结构并迭代以渲染链接
import type { Route } from 'next'

type NavItem<T extends string = string> = {
  href: T
  label: string
}

export const navItems: NavItem<Route>[] = [
  { href: '/', label: 'Home' },
  { href: '/about', label: 'About' },
  { href: '/blog', label: 'Blog' },
]
然后,遍历这些项以渲染 Link
import Link from 'next/link'
import { navItems } from './nav-items'

export function Nav() {
  return (
    <nav>
      {navItems.map((item) => (
        <Link key={item.href} href={item.href}>
          {item.label}
        </Link>
      ))}
    </nav>
  )
}
它是如何工作的?
在运行
next dev或next build时,Next.js 会在.next内部生成一个隐藏的.d.ts文件,其中包含有关应用程序中所有现有路由的信息(所有有效路由作为Link的href类型)。此.d.ts文件包含在tsconfig.json中,TypeScript 编译器将检查该.d.ts文件并在编辑器中提供有关无效链接的反馈。
环境变量的类型智能感知
在开发过程中,Next.js 会在 .next/types 中生成一个 .d.ts 文件,其中包含有关加载的环境变量的信息,供您的编辑器的智能感知使用。如果同一个环境变量键在多个文件中定义,则会根据环境变量加载顺序进行去重。
要选择使用此功能,需要启用 experimental.typedEnv 并且项目需要使用 TypeScript。
import type { NextConfig } from 'next'

const nextConfig: NextConfig = {
  experimental: {
    typedEnv: true,
  },
}

export default nextConfig温馨提示:类型是根据开发运行时加载的环境变量生成的,默认情况下不包括来自
.env.production*文件的变量。要包含生产特定的变量,请使用NODE_ENV=production运行next dev。
使用异步服务器组件
要将 async 服务器组件与 TypeScript 一起使用,请确保您使用的是 TypeScript 5.1.3 或更高版本以及 @types/react 18.2.8 或更高版本。
如果您使用的是旧版 TypeScript,可能会看到 'Promise<Element>' is not a valid JSX element 类型错误。更新到最新版本的 TypeScript 和 @types/react 应该可以解决此问题。
增量类型检查
从 v10.2.1 开始,当在您的 tsconfig.json 中启用时,Next.js 支持增量类型检查,这有助于加快大型应用程序的类型检查速度。
自定义 tsconfig 路径
在某些情况下,您可能希望为构建或工具使用不同的 TypeScript 配置。为此,请在 next.config.ts 中设置 typescript.tsconfigPath,以将 Next.js 指向另一个 tsconfig 文件。
import type { NextConfig } from 'next'

const nextConfig: NextConfig = {
  typescript: {
    tsconfigPath: 'tsconfig.build.json',
  },
}

export default nextConfig
例如,切换到不同的生产构建配置
import type { NextConfig } from 'next'

const isProd = process.env.NODE_ENV === 'production'

const nextConfig: NextConfig = {
  typescript: {
    tsconfigPath: isProd ? 'tsconfig.build.json' : 'tsconfig.json',
  },
}

export default nextConfig
为什么您可能需要为构建使用单独的 tsconfig
您可能需要放宽检查,例如在 monorepo 场景中,构建还会验证与项目标准不匹配的共享依赖项,或者在 CI 中放宽检查以在本地迁移到更严格的 TypeScript 设置时继续交付(并且仍希望您的 IDE 突出显示错误使用)。
例如,如果您的项目使用 useUnknownInCatchVariables,但某些 monorepo 依赖项仍假定为 any
{
  "extends": "./tsconfig.json",
  "compilerOptions": {
    "useUnknownInCatchVariables": false
  }
}
这通过 tsconfig.json 保持您的编辑器严格,同时允许生产构建使用宽松设置。
须知:
- IDE 通常读取
tsconfig.json以进行诊断和智能感知,因此您仍然可以看到 IDE 警告,而生产构建使用替代配置。如果您希望在编辑器中保持一致,请镜像关键选项。- 在开发中,只有
tsconfig.json会被监听更改。如果您通过typescript.tsconfigPath编辑了不同的文件名,请重新启动开发服务器以应用更改。- 配置的文件用于
next dev、next build和next typegen。
在生产环境中禁用 TypeScript 错误
当您的项目中存在 TypeScript 错误时,Next.js 会导致您的生产构建(next build)失败。
如果您希望 Next.js 即使在应用程序存在错误的情况下也危险地生成生产代码,您可以禁用内置的类型检查步骤。
如果禁用,请务必在构建或部署过程中运行类型检查,否则这可能非常危险。
打开 next.config.ts 并在 typescript 配置中启用 ignoreBuildErrors 选项
import type { NextConfig } from 'next'

const nextConfig: NextConfig = {
  typescript: {
    // !! WARN !!
    // Dangerously allow production builds to successfully complete even if
    // your project has type errors.
    // !! WARN !!
    ignoreBuildErrors: true,
  },
}

export default nextConfig温馨提示:您可以运行
tsc --noEmit来在构建之前自行检查 TypeScript 错误。这对于 CI/CD 管道非常有用,您可以在部署之前检查 TypeScript 错误。
自定义类型声明
当您需要声明自定义类型时,您可能会尝试修改 next-env.d.ts。但是,此文件是自动生成的,因此您所做的任何更改都将被覆盖。相反,您应该创建一个新文件,我们称之为 new-types.d.ts,并在您的 tsconfig.json 中引用它。
{
  "compilerOptions": {
    "skipLibCheck": true
    //...truncated...
  },
  "include": [
    "new-types.d.ts",
    "next-env.d.ts",
    ".next/types/**/*.ts",
    "**/*.ts",
    "**/*.tsx"
  ],
  "exclude": ["node_modules"]
}
版本变更
| 版本 | 更改 |
|---|---|
v15.0.0 | 为 TypeScript 项目添加了next.config.ts 支持。 |
v13.2.0 | 静态类型链接处于 Beta 阶段。 |
v12.0.0 | SWC 现在默认用于编译 TypeScript 和 TSX,以实现更快的构建。 |
v10.2.1 | 当在您的 tsconfig.json 中启用时,添加了增量类型检查支持。 |
这有帮助吗?