数据获取
本页面将引导您如何在服务器和客户端组件中获取数据,以及如何流式传输依赖于数据的组件。
数据获取
服务器组件
您可以使用以下方式在服务器组件中获取数据:
使用 fetch API
要使用 fetch API 获取数据,请将您的组件转换为异步函数,并等待 fetch 调用。例如:
export default async function Page() {
  const data = await fetch('https://api.vercel.app/blog')
  const posts = await data.json()
  return (
    <ul>
      {posts.map((post) => (
        <li key={post.id}>{post.title}</li>
      ))}
    </ul>
  )
}
须知
fetch响应默认不缓存。但是,Next.js 会预渲染路由,并且输出将被缓存以提高性能。如果您想选择动态渲染,请使用{ cache: 'no-store' }选项。请参阅fetchAPI 参考。- 在开发过程中,您可以记录
fetch调用,以便更好地可视化和调试。请参阅loggingAPI 参考。
使用 ORM 或数据库
由于服务器组件在服务器上渲染,因此您可以使用 ORM 或数据库客户端安全地进行数据库查询。将您的组件转换为异步函数,并等待调用:
import { db, posts } from '@/lib/db'

export default async function Page() {
  const allPosts = await db.select().from(posts)
  return (
    <ul>
      {allPosts.map((post) => (
        <li key={post.id}>{post.title}</li>
      ))}
    </ul>
  )
}
客户端组件
有两种方法可以在客户端组件中获取数据:
- React 的
use钩子 - 一个社区库,如 SWR 或 React Query
使用 use 钩子流式传输数据
您可以使用 React 的 use 钩子 将数据从服务器流式传输到客户端。首先在您的服务器组件中获取数据,并将 Promise 作为 prop 传递给您的客户端组件:
import Posts from '@/app/ui/posts'
import { Suspense } from 'react'

export default function Page() {
  // Don't await the data fetching function
  const posts = getPosts()

  return (
    <Suspense fallback={<div>Loading...</div>}>
      <Posts posts={posts} />
    </Suspense>
  )
}
然后,在您的客户端组件中,使用 use 钩子读取 Promise:
'use client'
import { use } from 'react'

export default function Posts({
  posts,
}: {
  posts: Promise<{ id: string; title: string }[]>
}) {
  const allPosts = use(posts)

  return (
    <ul>
      {allPosts.map((post) => (
        <li key={post.id}>{post.title}</li>
      ))}
    </ul>
  )
}在上面的例子中,<Posts> 组件被包装在 <Suspense> 边界 中。这意味着在 Promise 解决时将显示回退内容。了解更多关于流式传输的信息。
社区库
您可以使用像 SWR 或 React Query 这样的社区库在客户端组件中获取数据。这些库有自己的缓存、流式传输和其他功能的语义。例如,使用 SWR:
'use client'
import useSWR from 'swr'

const fetcher = (url) => fetch(url).then((r) => r.json())

export default function BlogPage() {
  const { data, error, isLoading } = useSWR(
    'https://api.vercel.app/blog',
    fetcher
  )

  if (isLoading) return <div>Loading...</div>
  if (error) return <div>Error: {error.message}</div>

  return (
    <ul>
      {data.map((post: { id: string; title: string }) => (
        <li key={post.id}>{post.title}</li>
      ))}
    </ul>
  )
}
请求去重和数据缓存
去重 fetch 请求的一种方法是使用请求记忆化。通过这种机制,在单个渲染过程中,使用相同 URL 和选项的 GET 或 HEAD 类型的 fetch 调用将合并为一个请求。这会自动发生,您可以通过将 Abort 信号传递给 fetch 来选择退出。
请求记忆化的作用域仅限于请求的生命周期。
您还可以通过使用 Next.js 的数据缓存来去重 fetch 请求,例如在您的 fetch 选项中设置 cache: 'force-cache'。
数据缓存允许在当前渲染通道和传入请求之间共享数据。
如果您**不**使用 fetch,而是直接使用 ORM 或数据库,您可以使用 React cache 函数包装您的数据访问。
import { cache } from 'react'
import { db, posts, eq } from '@/lib/db'

export const getPost = cache(async (id: string) => {
  const post = await db.query.posts.findFirst({
    where: eq(posts.id, parseInt(id)),
  })
})
流式传输
警告:以下内容假设您的应用程序中已启用
cacheComponents配置选项。该标志是在 Next.js 15 canary 中引入的。
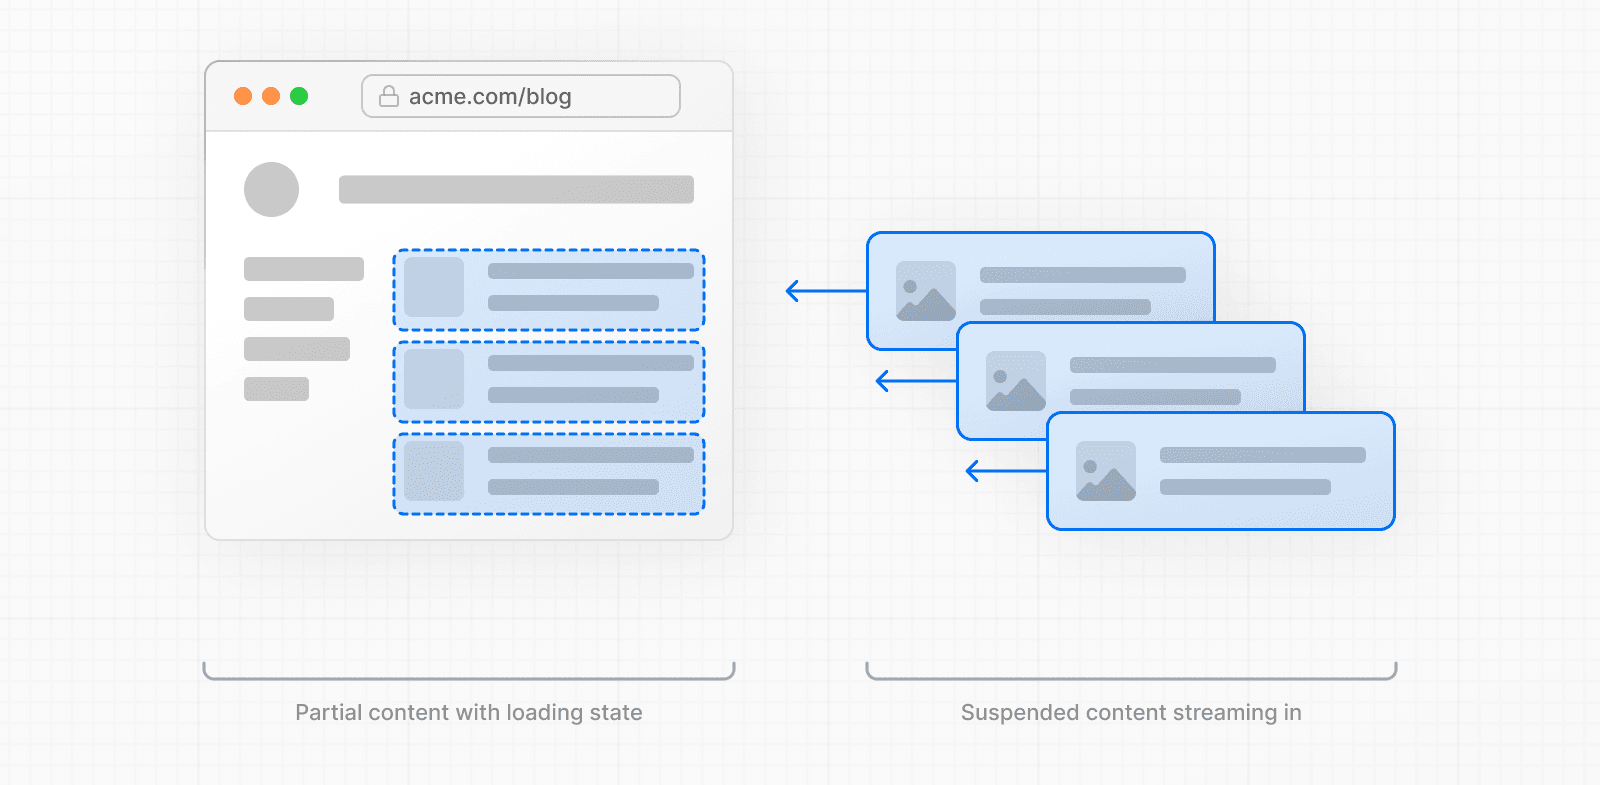
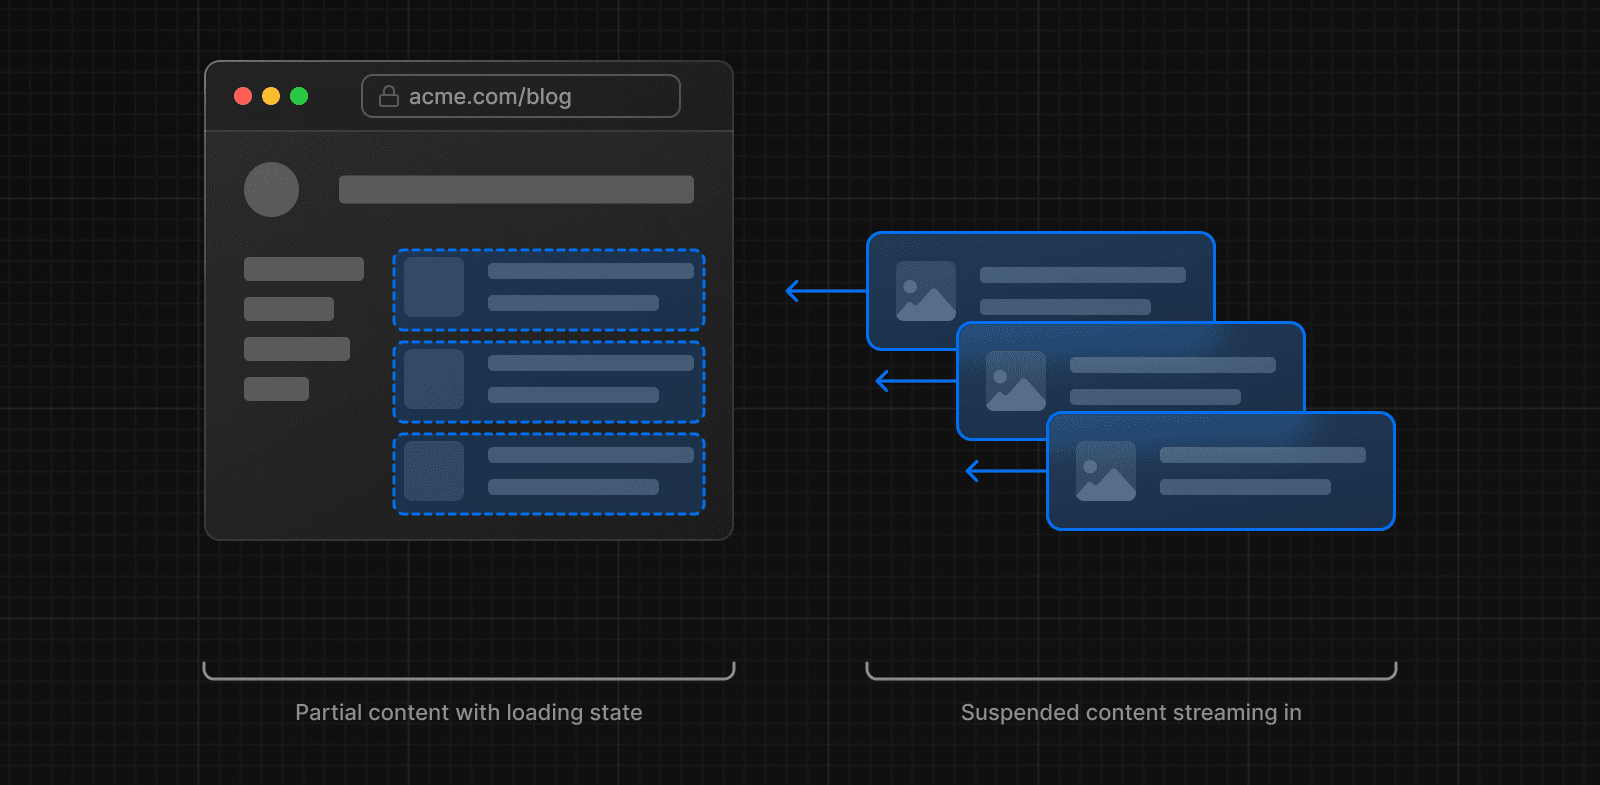
当您在服务器组件中获取数据时,数据会为每个请求在服务器上获取并渲染。如果您的数据请求速度较慢,那么在所有数据都获取完毕之前,整个路由都将被阻止渲染。
为了改善初始加载时间和用户体验,您可以使用流式传输将页面的 HTML 分割成更小的块,并逐步将这些块从服务器发送到客户端。
您可以通过两种方式在应用程序中实现流式传输:
- 使用
loading.js文件包装页面 - 使用
<Suspense>包装组件
使用 loading.js
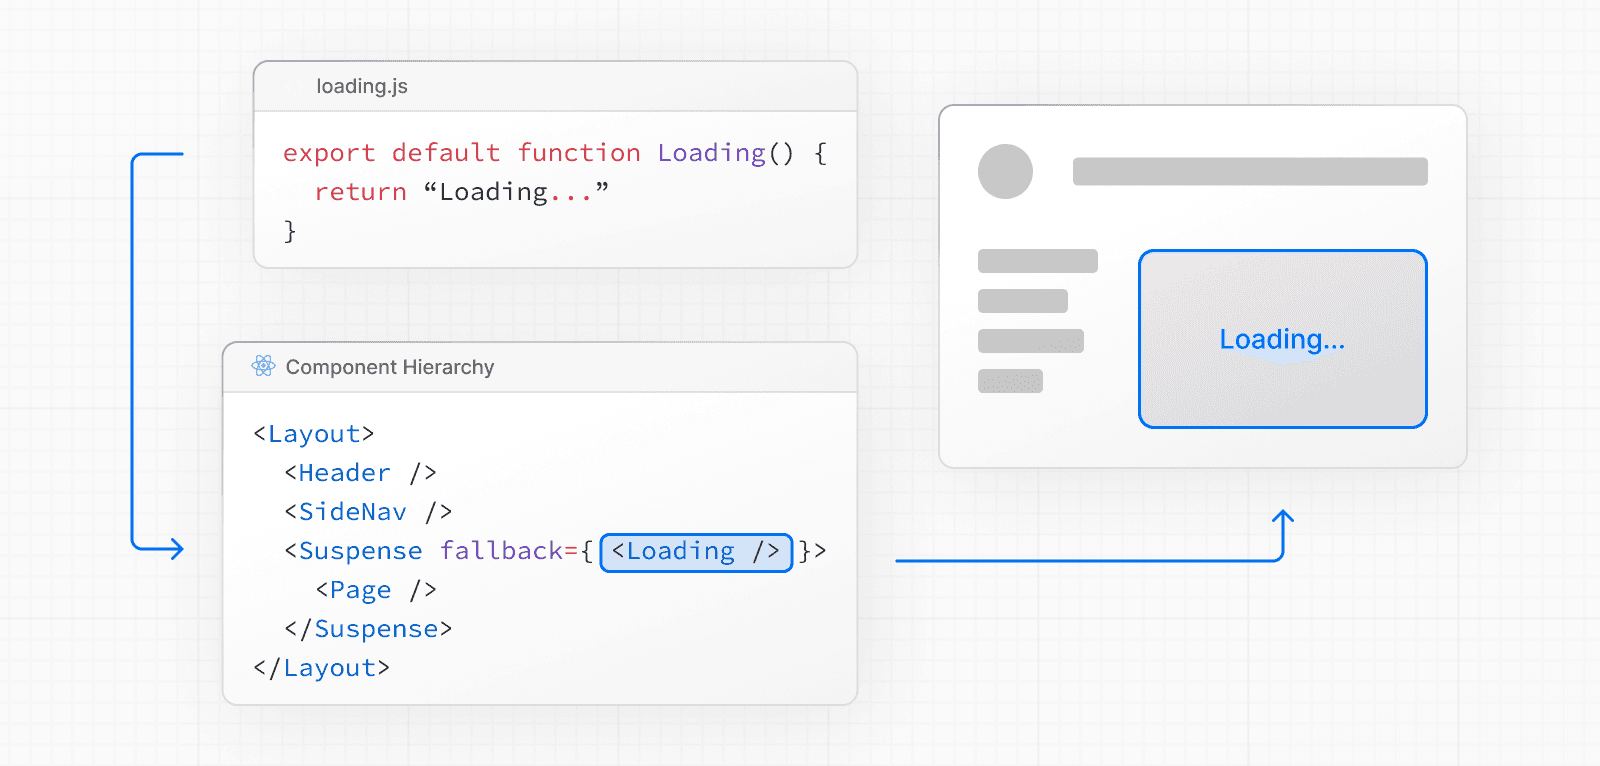
您可以在与页面相同的文件夹中创建一个 loading.js 文件,以便在数据获取时流式传输**整个页面**。例如,要流式传输 app/blog/page.js,请将文件添加到 app/blog 文件夹中。


export default function Loading() {
  // Define the Loading UI here
  return <div>Loading...</div>
}在导航时,用户将立即看到布局和加载状态,同时页面正在渲染。渲染完成后,新内容将自动替换进来。

在幕后,loading.js 将嵌套在 layout.js 中,并将自动将 page.js 文件和下面的任何子级包装在 <Suspense> 边界中。

这种方法适用于路由片段(布局和页面),但对于更细粒度的流式传输,您可以使用 <Suspense>。
使用 <Suspense>
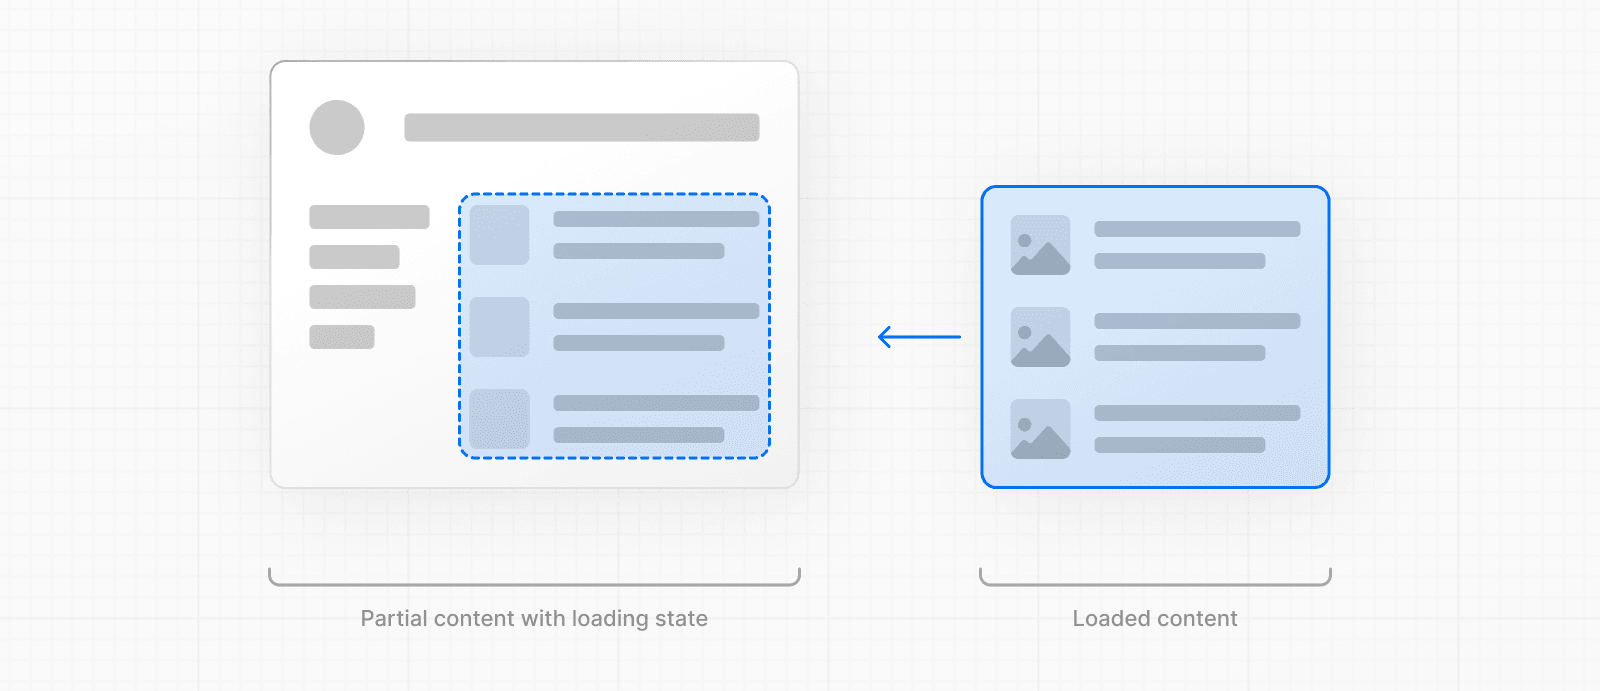
<Suspense> 允许您更精细地控制页面哪些部分进行流式传输。例如,您可以立即显示 <Suspense> 边界之外的任何页面内容,并在边界内流式传输博客文章列表。
import { Suspense } from 'react'
import BlogList from '@/components/BlogList'
import BlogListSkeleton from '@/components/BlogListSkeleton'

export default function BlogPage() {
  return (
    <div>
      {/* This content will be sent to the client immediately */}
      <header>
        <h1>Welcome to the Blog</h1>
        <p>Read the latest posts below.</p>
      </header>
      <main>
        {/* Any content wrapped in a <Suspense> boundary will be streamed */}
        <Suspense fallback={<BlogListSkeleton />}>
          <BlogList />
        </Suspense>
      </main>
    </div>
  )
}
创建有意义的加载状态
即时加载状态是一种回退 UI,在导航后立即显示给用户。为了获得最佳用户体验,我们建议设计有意义的加载状态,帮助用户理解应用程序正在响应。例如,您可以使用骨架屏和加载动画,或者未来屏幕的一小部分但有意义的部分,例如封面照片、标题等。
在开发中,您可以使用 React Devtools 预览和检查组件的加载状态。
示例
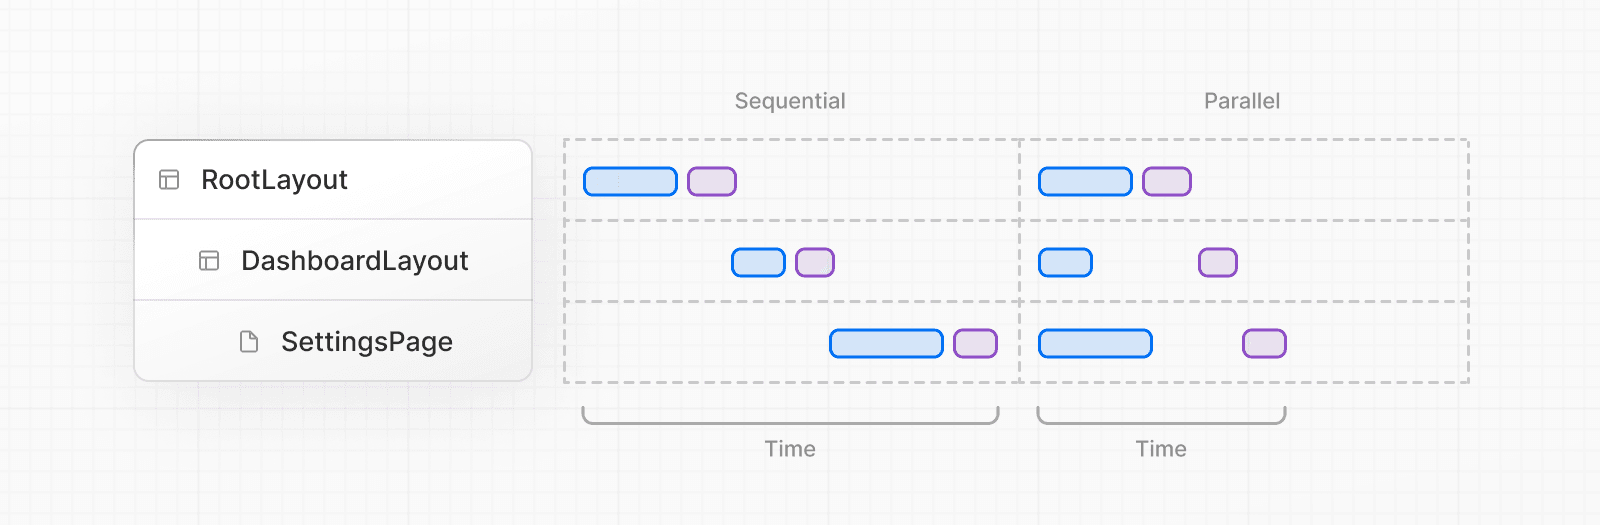
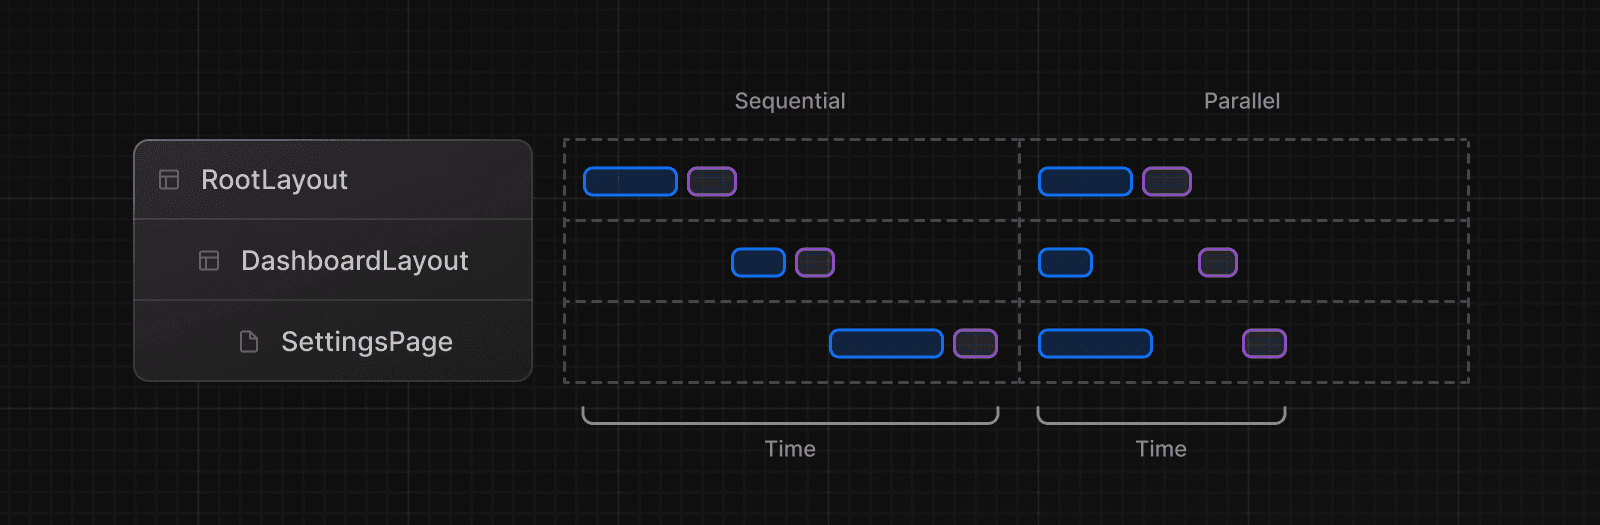
顺序数据获取
顺序数据获取发生在树中嵌套组件各自获取数据且请求未去重时,导致响应时间延长。
在某些情况下,您可能需要这种模式,因为一个 fetch 依赖于另一个的结果。
例如,<Playlists> 组件只有在 <Artist> 组件完成数据获取后才会开始获取数据,因为 <Playlists> 依赖于 artistID prop。
export default async function Page({
  params,
}: {
  params: Promise<{ username: string }>
}) {
  const { username } = await params
  // Get artist information
  const artist = await getArtist(username)

  return (
    <>
      <h1>{artist.name}</h1>
      {/* Show fallback UI while the Playlists component is loading */}
      <Suspense fallback={<div>Loading...</div>}>
        {/* Pass the artist ID to the Playlists component */}
        <Playlists artistID={artist.id} />
      </Suspense>
    </>
  )
}

async function Playlists({ artistID }: { artistID: string }) {
  // Use the artist ID to fetch playlists
  const playlists = await getArtistPlaylists(artistID)

  return (
    <ul>
      {playlists.map((playlist) => (
        <li key={playlist.id}>{playlist.name}</li>
      ))}
    </ul>
  )
}
为了改善用户体验,您应该使用 React <Suspense> 在数据获取时显示一个 fallback。这将启用流式传输,并防止整个路由被顺序数据请求阻塞。
并行数据获取
并行数据获取发生在路由中的数据请求被主动发起并同时开始时。
默认情况下,布局和页面是并行渲染的。因此,每个片段都会尽快开始获取数据。
然而,在**任何**组件中,如果多个 async/await 请求相互放置,它们仍然可以是顺序的。例如,getAlbums 将被阻塞,直到 getArtist 被解析。
import { getArtist, getAlbums } from '@/app/lib/data'

export default async function Page({ params }) {
  // These requests will be sequential
  const { username } = await params
  const artist = await getArtist(username)
  const albums = await getAlbums(username)
  return <div>{artist.name}</div>
}
通过调用 fetch 发起多个请求,然后使用 Promise.all 等待它们。请求在调用 fetch 后立即开始。
import Albums from './albums'

async function getArtist(username: string) {
  const res = await fetch(`https://api.example.com/artist/${username}`)
  return res.json()
}

async function getAlbums(username: string) {
  const res = await fetch(`https://api.example.com/artist/${username}/albums`)
  return res.json()
}

export default async function Page({
  params,
}: {
  params: Promise<{ username: string }>
}) {
  const { username } = await params

  // Initiate requests
  const artistData = getArtist(username)
  const albumsData = getAlbums(username)

  const [artist, albums] = await Promise.all([artistData, albumsData])

  return (
    <>
      <h1>{artist.name}</h1>
      <Albums list={albums} />
    </>
  )
}需要注意:如果在使用
Promise.all时一个请求失败,整个操作都将失败。为了处理这种情况,您可以使用Promise.allSettled方法来代替。
预加载数据
您可以通过创建一个实用函数来预加载数据,该函数在阻塞请求之前主动调用。<Item> 根据 checkIsAvailable() 函数有条件地渲染。
您可以在 checkIsAvailable() 之前调用 preload(),以主动启动 <Item/> 数据依赖。当 <Item/> 渲染时,其数据已提前获取。
import { getItem, checkIsAvailable } from '@/lib/data'

export default async function Page({
  params,
}: {
  params: Promise<{ id: string }>
}) {
  const { id } = await params
  // starting loading item data
  preload(id)
  // perform another asynchronous task
  const isAvailable = await checkIsAvailable()

  return isAvailable ? <Item id={id} /> : null
}

export const preload = (id: string) => {
  // void evaluates the given expression and returns undefined
  // https://mdn.org.cn/docs/Web/JavaScript/Reference/Operators/void
  void getItem(id)
}
export async function Item({ id }: { id: string }) {
  const result = await getItem(id)
  // ...
}
此外,您可以使用 React 的 cache 函数 和 server-only 包 来创建一个可重用的实用函数。这种方法允许您缓存数据获取函数并确保它仅在服务器上执行。
import { cache } from 'react'
import 'server-only'
import { getItem } from '@/lib/data'

export const preload = (id: string) => {
  void getItem(id)
}

export const getItem = cache(async (id: string) => {
  // ...
})这有帮助吗?